Do you want to get your website visitors to follow you on social media? A floating bar is one of the best ways to display your social profiles and prompt a user to follow or subscribe without disturbing their browsing experience.
Floating social bars can help you grow your social media following, boost engagement, and increase brand awareness.
In this tutorial, I’m going to show the easiest and most powerful way to add floating social media bars to your WordPress site.
What Is a Floating Social Bar?
A floating social bar lets you display links to your social profiles on the top or bottom of any page of your website. The word “floating” means that the bar stays in place as the website visitor scrolls.

With these bars, you won’t need to manually add social icons to every page. Instead, you can set it up to display across every page on your site, or you could include/exclude specific URLs.
Floating bars can either stick to the top or bottom of the page so they remain visible to users at all times. This means they’ll be more likely to click on it and engage with your social media pages.
When used correctly, floating social bars can do wonders for your business by:
- Driving traffic to social media handles
- Building your following and subscriber base
- Boosting engagement
…and much more!
Thankfully, you can get all of the benefits of floating social media bars without having to hire a developer or designer.
How to Create Floating Social Bars in WordPress
OptinMonster is the best way create stunning floating social bars to increase your social media following. This powerful lead generation tool comes with 700+ attention-grabbing templates designed to convert visitors into followers.

In addition to floating bars, you can also use OptinMonster to create popups, slide-in boxes, fullscreen mats, coupon wheels, and more. You can also use the codeless drag-and-drop builder to customize the template and make your floating bar stand out with images, text, and social icons.
OptinMonster has tons of targeting rules to display the floating bar at the right time to the right people. So, for example, with OptinMonster’s Growth plan, you can use the New Visitor targeting rule to display your social bar exclusively to first-time visitors.
OptinMonster also tracks every campaign, so you can see exactly how many people saw your floating bar and how many clicked through to your social media profile.
Check out how ActiveCampaign adds 800 free trials every month with one floating bar
OptinMonster’s floating bar campaigns are flexible, and you can tailor your messages to promote sales, offer discounts, draw attention to a free trial, and more.
You can accomplish all this and more by following these 6 steps:
Step 1: Sign Up for OptinMonster
First, you’ll need to choose an OptinMonster plan. With any OptinMonster plan, you can create floating bars that include buttons that link to your social pages.
I suggest going for the Pro plan or higher, which gives you access to:
- Social Media Button smart blocks, which make it easier and faster to link to your social pages
- Other advanced elements such as Countdown Timers and Smart Tags.
- Advanced Display Rules such as Exit-Intent® technology
BONUS: Done-For-You Campaign Setup ($297 value)
Our conversion experts will design 1 free campaign for you to get maximum results – absolutely FREE!
You’ll also want to install the OptinMonster WordPress plugin, which streamlines the process of publishing campaigns to your site.
Note: OptinMonster works with every type of website, not just WordPress. The steps in this tutorial apply to any site. The only thing that will change for a non-WordPress site is the process for publishing your floating bar.
Step 2: Choose a Floating Bar Template
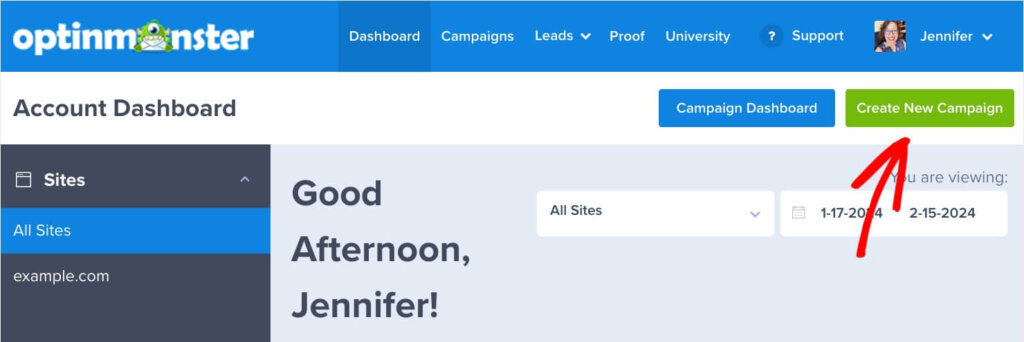
Now you can log in to your OptinMonster account. Click the Create New Campaign button in the top right corner.
You’ll see a window asking how you want to create your campaign. I suggest starting with a Template.
Now, you’ll be able to browse all of OptinMonster’s 700+ templates. Under Select a Campaign Type choose Floating Bar to filter for just the floating bar templates.

You can explore the templates by hovering over them and selecting the Preview option.
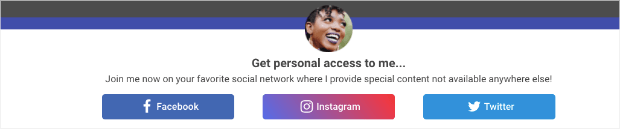
Today, I’m going to choose the Follow on Social Media template, which looks like this:

After you click Use Template, you’ll be prompted to give your floating social bar a name. Then click Start Building.
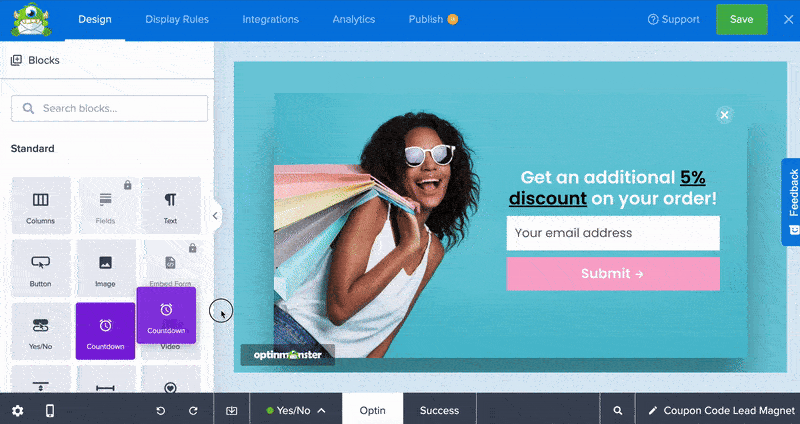
This will open up the OptinMonster campaign editor, where you can customize the template.
Step 3: Customize the Floating Social Bar
Customizing your floating bar has never been easier! OptinMonster has a visual drag-and-drop builder that makes it incredibly easy to add, remove, and edit elements.
You can edit any text directly in the visual builder:

To edit the social buttons, simply click on them to see editing options in the left menu:

You can also add any elements you want, such as images or countdown timers. It only takes seconds with the drag-and-drop builder:
Today, I started with a template that already included social media buttons. However, you can add social buttons to any OptinMonster template.
For example, I dragged the Social Media Buttons smart block into this newsletter signup template. I customized the block to only show the social icons.

For more on using the Social Media Buttons smart block, see this quick video or check out our documentation.
The Social Media Buttons smart block comes with OptinMonster’s Pro plan or higher. However, you can create a floating social bar with any OptinMonster plan. You’ll just need to spend a little more time setting up your buttons.
Step 4: Choose Your Floating Social Bar Position
By default, many of OptinMonster’s floating bar templates display at the bottom of the page. If you’d like your bar to appear at the top, simply click the Cog icon at the bottom left of the campaign builder. Then turn on the Load Floating Bar at top of page? toggle.

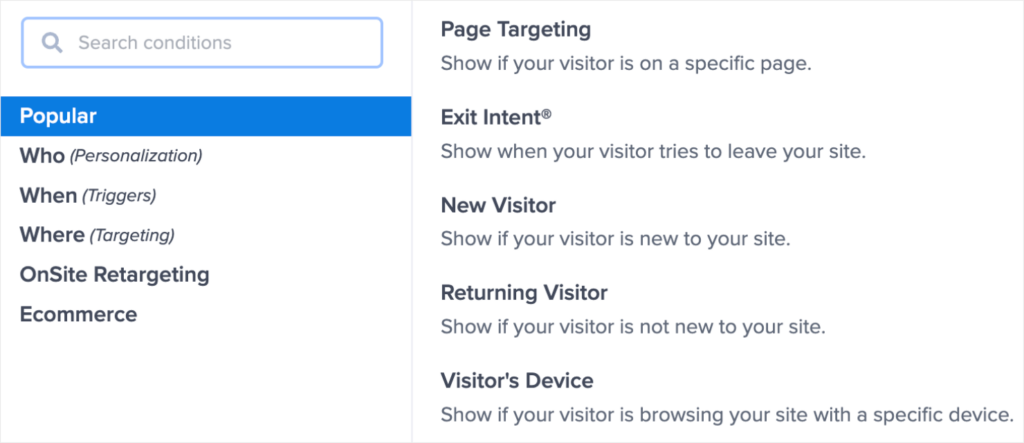
Step 5: Target Visitors with Display Rules
OptinMonster lets you target your visitors in different ways so you can get more of them to subscribe, follow, like, and share.
In the OptinMonster campaign builder, open the Display Rules tab. Here, you’ll see that OptinMonster displays the campaign by default after a user spends 5 seconds on any page:
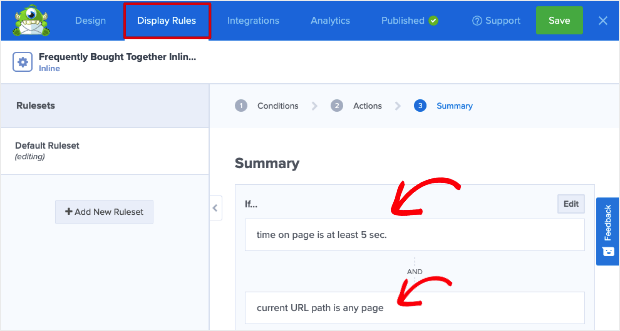
To change this, edit the default options to access all the display rules available. You’ll see a list of rules neatly categorized, so it’s easy to find what you’re looking for.
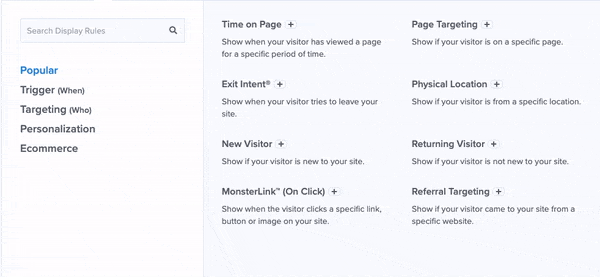
Here are a few ways you can target visitors:
- Time-based: Wait till a visitor has spent a certain amount of time on a page or schedule a date and time
- Page-level: Create targeted campaigns for specific URLs
- Scroll-depth: After a visitor has scrolled a certain amount of the page
- Referral source: Show campaigns to visitors coming from a specific website or social media platform
- Geolocation: Customize the customer experience by targeting users based on their physical location
- OnSite® Retargeting: Keep users engaged by showing new campaigns to returning visitors
And that’s just to name a few. You simply need to select the rule from the list of options available, and OptinMonster will display the floating bar accordingly.
Usually, the next step is to integrate the campaign with your email service provider. This is a really handy feature if you include an optin form for people to sign up for your marketing emails and newsletters.
OptinMonster integrates with all popular email service providers including Constant Contact, Mailchimp, Drip, and Brevo (formerly Sendinblue).
Since the floating social bar doesn’t have any optin fields, we can skip this step and publish the campaign as it is.
Step 6: Publish Your Campaign
The floating social bar is now ready to go live on your site. To do this, switch to the Publish tab.
You’ll see an option to preview your campaign. Then you can set the status to ‘Publish’ to launch your floating social bar.
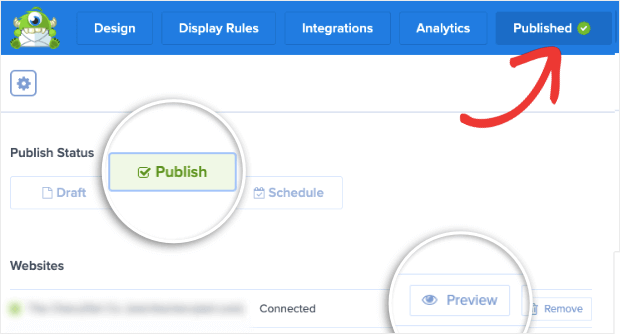
If you haven’t connected your website to OptinMonster yet, you’ll find instructions to do so at the bottom of this page.

Next, visit the OptinMonster » Campaigns page in your WordPress admin area. Make sure your campaign is set to ‘Publish‘ here as well.

Now you can visit your website, and you’ll see the floating bar appear according to the display rules you’ve set.
If you haven’t signed up for OptinMonster yet, what are you waiting for? Get your 100% risk-free OptinMonster account now by clicking below:
BONUS: Done-For-You Campaign Setup ($297 value)
Our conversion experts will design 1 free campaign for you to get maximum results – absolutely FREE!
Related Resources
- 23 Social Media Marketing Tools That Will Give You an Unfair Advantage
- 11 Social Media Metrics You Need to Nail Your Marketing Goals
- 9 Ways to Grow Your Email List with Social Media
Comments
Post a Comment